---
comments: true
description: Learn how to train your data on custom datasets using YOLOv5. Simple and updated guide on collection and organization of images, labelling, model training and deployment.
keywords: YOLOv5, train on custom dataset, image collection, model training, object detection, image labelling, Ultralytics, PyTorch, machine learning
---
📚 This guide explains how to train your own **custom dataset** with [YOLOv5](https://github.com/ultralytics/yolov5) 🚀.
## Before You Start
Clone repo and install [requirements.txt](https://github.com/ultralytics/yolov5/blob/master/requirements.txt) in a [**Python>=3.8.0**](https://www.python.org/) environment, including [**PyTorch>=1.8**](https://pytorch.org/get-started/locally/). [Models](https://github.com/ultralytics/yolov5/tree/master/models) and [datasets](https://github.com/ultralytics/yolov5/tree/master/data) download automatically from the latest YOLOv5 [release](https://github.com/ultralytics/yolov5/releases).
```bash
git clone https://github.com/ultralytics/yolov5 # clone
cd yolov5
pip install -r requirements.txt # install
```
## Train On Custom Data

Creating a custom model to detect your objects is an iterative process of collecting and organizing images, labeling your objects of interest, training a model, deploying it into the wild to make predictions, and then using that deployed model to collect examples of edge cases to repeat and improve.
### 1. Create Dataset
YOLOv5 models must be trained on labelled data in order to learn classes of objects in that data. There are two options for creating your dataset before you start training:
Use Roboflow to create your dataset in YOLO format 🌟
!!! Warning
Roboflow users can use Ultralytics under the [AGPL license](https://github.com/ultralytics/ultralytics/blob/main/LICENSE) or can request an [Enterprise license](https://ultralytics.com/license) directly from Ultralytics. Be aware that Roboflow does not provide Ultralytics licenses, and it is the responsibility of the user to ensure appropriate licensing.
### 1.1 Collect Images
Your model will learn by example. Training on images similar to the ones it will see in the wild is of the utmost importance. Ideally, you will collect a wide variety of images from the same configuration (camera, angle, lighting, etc.) as you will ultimately deploy your project.
If this is not possible, you can start from [a public dataset](https://universe.roboflow.com/?ref=ultralytics) to train your initial model and then [sample images from the wild during inference](https://blog.roboflow.com/computer-vision-active-learning-tips/?ref=ultralytics) to improve your dataset and model iteratively.
### 1.2 Create Labels
Once you have collected images, you will need to annotate the objects of interest to create a ground truth for your model to learn from.
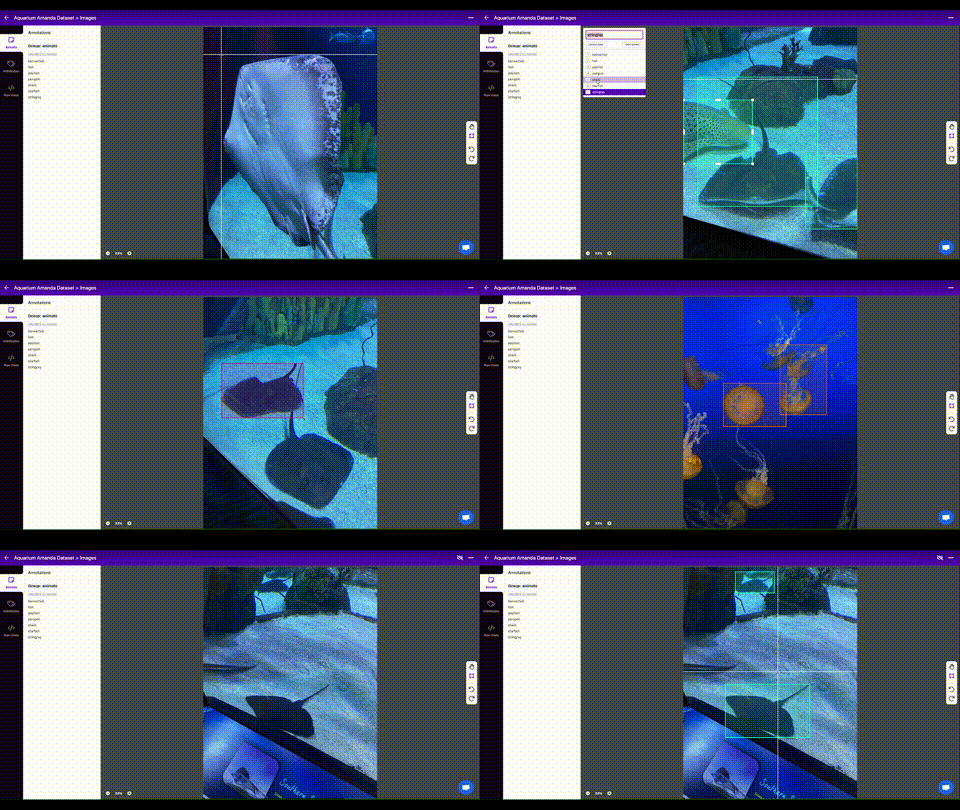
[Roboflow Annotate](https://roboflow.com/annotate?ref=ultralytics) is a simple web-based tool for managing and labeling your images with your team and exporting them in [YOLOv5's annotation format](https://roboflow.com/formats/yolov5-pytorch-txt?ref=ultralytics).
### 1.3 Prepare Dataset for YOLOv5
Whether you [label your images with Roboflow](https://roboflow.com/annotate?ref=ultralytics) or not, you can use it to convert your dataset into YOLO format, create a YOLOv5 YAML configuration file, and host it for importing into your training script.
[Create a free Roboflow account](https://app.roboflow.com/?model=yolov5&ref=ultralytics)
and upload your dataset to a `Public` workspace, label any unannotated images, then generate and export a version of your dataset in `YOLOv5 Pytorch` format.
Note: YOLOv5 does online augmentation during training, so we do not recommend applying any augmentation steps in Roboflow for training with YOLOv5. But we recommend applying the following preprocessing steps:
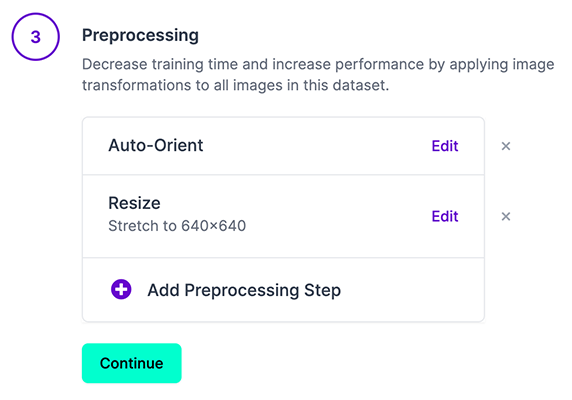
* **Auto-Orient** - to strip EXIF orientation from your images.
* **Resize (Stretch)** - to the square input size of your model (640x640 is the YOLOv5 default).
Generating a version will give you a point in time snapshot of your dataset so you can always go back and compare your future model training runs against it, even if you add more images or change its configuration later.
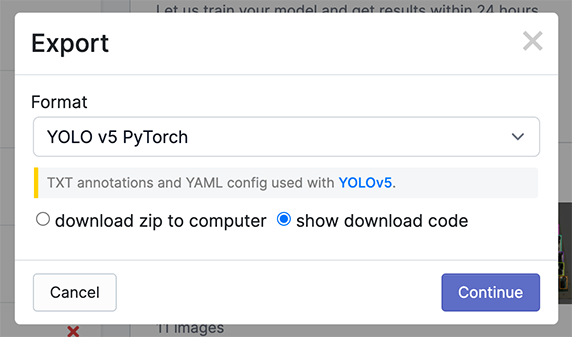
Export in `YOLOv5 Pytorch` format, then copy the snippet into your training script or notebook to download your dataset.
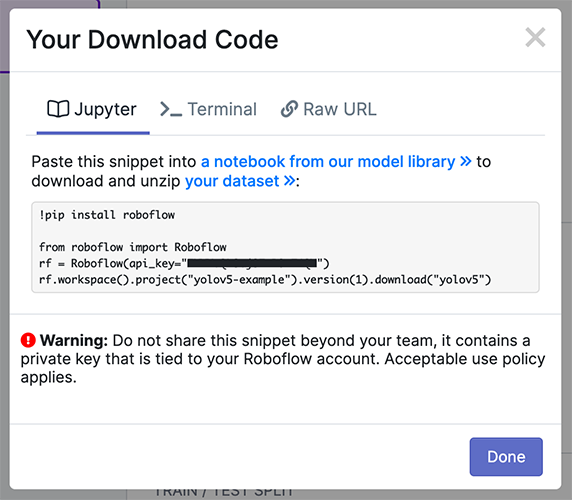
Now continue with `2. Select a Model`.
Or manually prepare your dataset
### 1.1 Create dataset.yaml
[COCO128](https://www.kaggle.com/ultralytics/coco128) is an example small tutorial dataset composed of the first 128 images in [COCO](http://cocodataset.org/#home) train2017. These same 128 images are used for both training and validation to verify our training pipeline is capable of overfitting. [data/coco128.yaml](https://github.com/ultralytics/yolov5/blob/master/data/coco128.yaml), shown below, is the dataset config file that defines 1) the dataset root directory `path` and relative paths to `train` / `val` / `test` image directories (or *.txt files with image paths) and 2) a class `names` dictionary:
```yaml
# Train/val/test sets as 1) dir: path/to/imgs, 2) file: path/to/imgs.txt, or 3) list: [path/to/imgs1, path/to/imgs2, ..]
path: ../datasets/coco128 # dataset root dir
train: images/train2017 # train images (relative to 'path') 128 images
val: images/train2017 # val images (relative to 'path') 128 images
test: # test images (optional)
# Classes (80 COCO classes)
names:
0: person
1: bicycle
2: car
# ...
77: teddy bear
78: hair drier
79: toothbrush
```
### 1.2 Create Labels
After using an annotation tool to label your images, export your labels to **YOLO format**, with one `*.txt` file per image (if no objects in image, no `*.txt` file is required). The `*.txt` file specifications are:
- One row per object
- Each row is `class x_center y_center width height` format.
- Box coordinates must be in **normalized xywh** format (from 0 to 1). If your boxes are in pixels, divide `x_center` and `width` by image width, and `y_center` and `height` by image height.
- Class numbers are zero-indexed (start from 0).
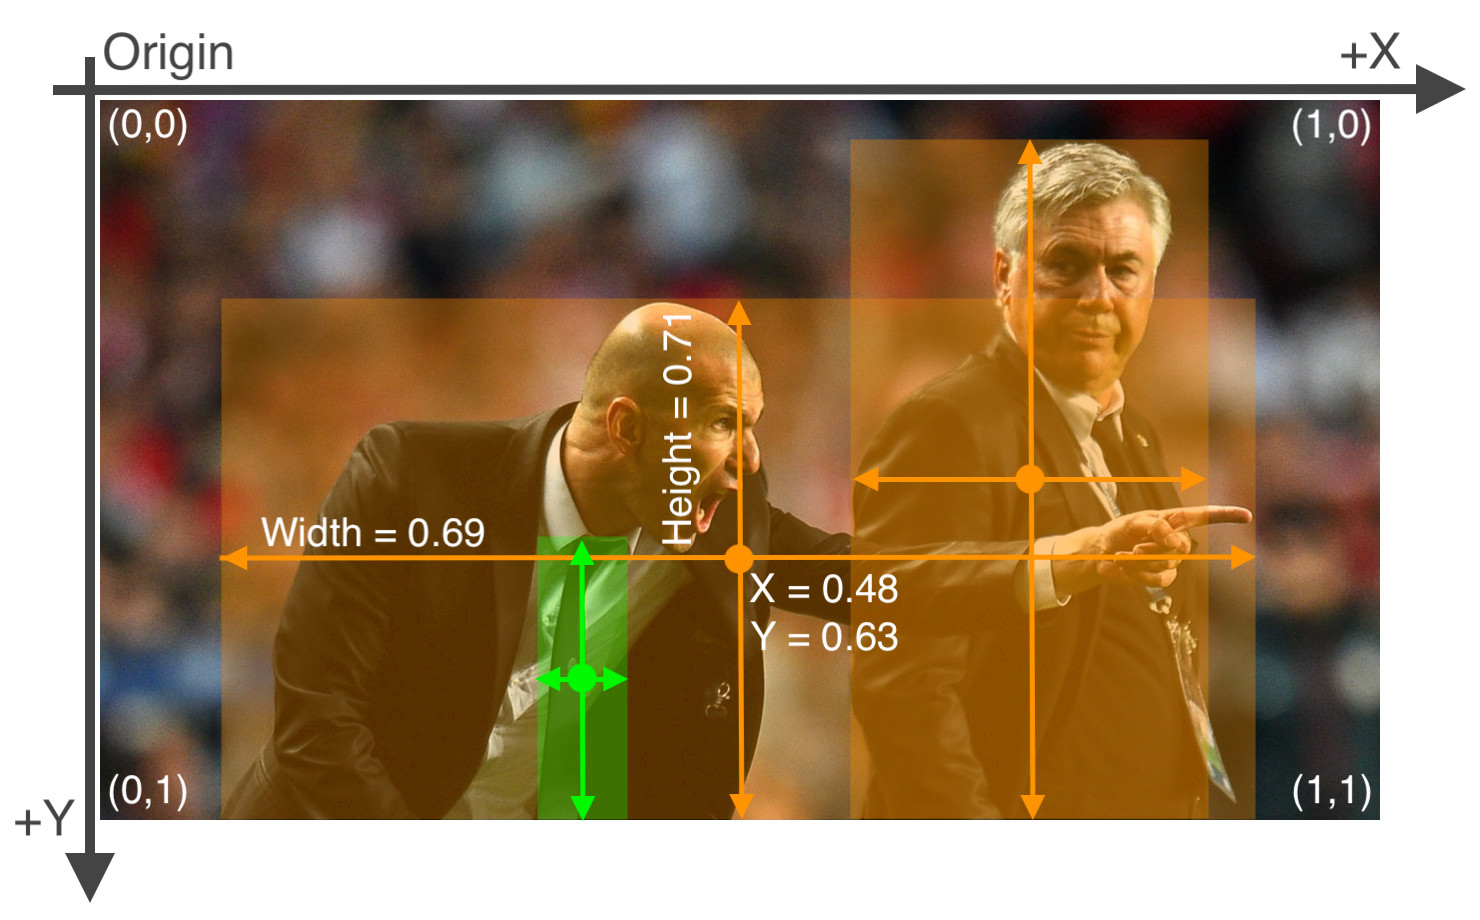
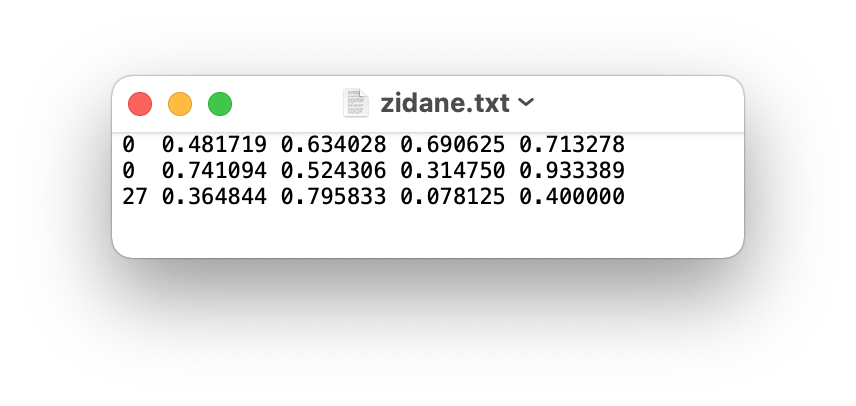
The label file corresponding to the above image contains 2 persons (class `0`) and a tie (class `27`):
### 1.3 Organize Directories
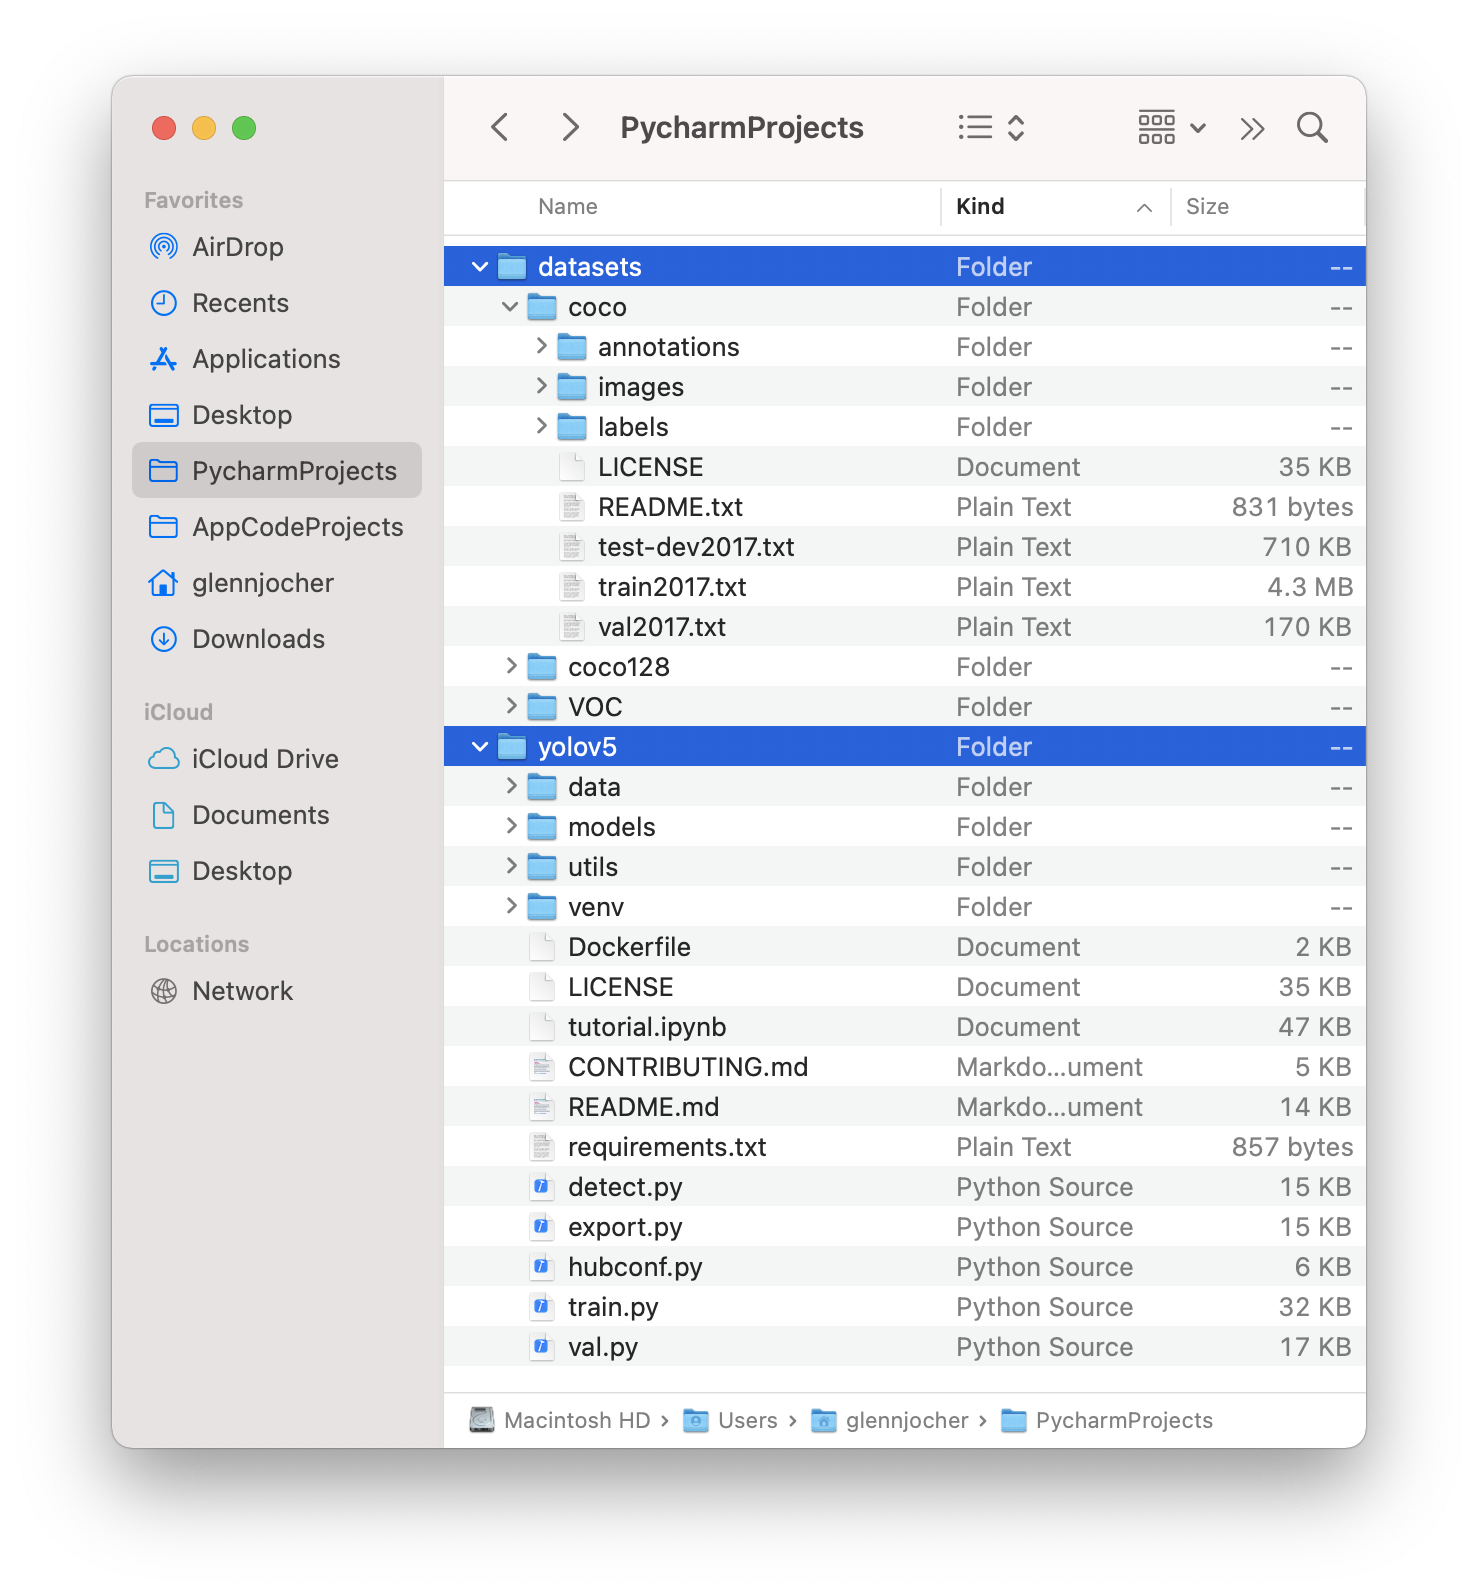
Organize your train and val images and labels according to the example below. YOLOv5 assumes `/coco128` is inside a `/datasets` directory **next to** the `/yolov5` directory. **YOLOv5 locates labels automatically for each image** by replacing the last instance of `/images/` in each image path with `/labels/`. For example:
```bash
../datasets/coco128/images/im0.jpg # image
../datasets/coco128/labels/im0.txt # label
```
### 2. Select a Model
Select a pretrained model to start training from. Here we select [YOLOv5s](https://github.com/ultralytics/yolov5/blob/master/models/yolov5s.yaml), the second-smallest and fastest model available. See our README [table](https://github.com/ultralytics/yolov5#pretrained-checkpoints) for a full comparison of all models.

### 3. Train
Train a YOLOv5s model on COCO128 by specifying dataset, batch-size, image size and either pretrained `--weights yolov5s.pt` (recommended), or randomly initialized `--weights '' --cfg yolov5s.yaml` (not recommended). Pretrained weights are auto-downloaded from the [latest YOLOv5 release](https://github.com/ultralytics/yolov5/releases).
```bash
python train.py --img 640 --epochs 3 --data coco128.yaml --weights yolov5s.pt
```
!!! Tip "Tip"
💡 Add `--cache ram` or `--cache disk` to speed up training (requires significant RAM/disk resources).
!!! Tip "Tip"
💡 Always train from a local dataset. Mounted or network drives like Google Drive will be very slow.
All training results are saved to `runs/train/` with incrementing run directories, i.e. `runs/train/exp2`, `runs/train/exp3` etc. For more details see the Training section of our tutorial notebook. 
 ### 4. Visualize
#### Comet Logging and Visualization 🌟 NEW
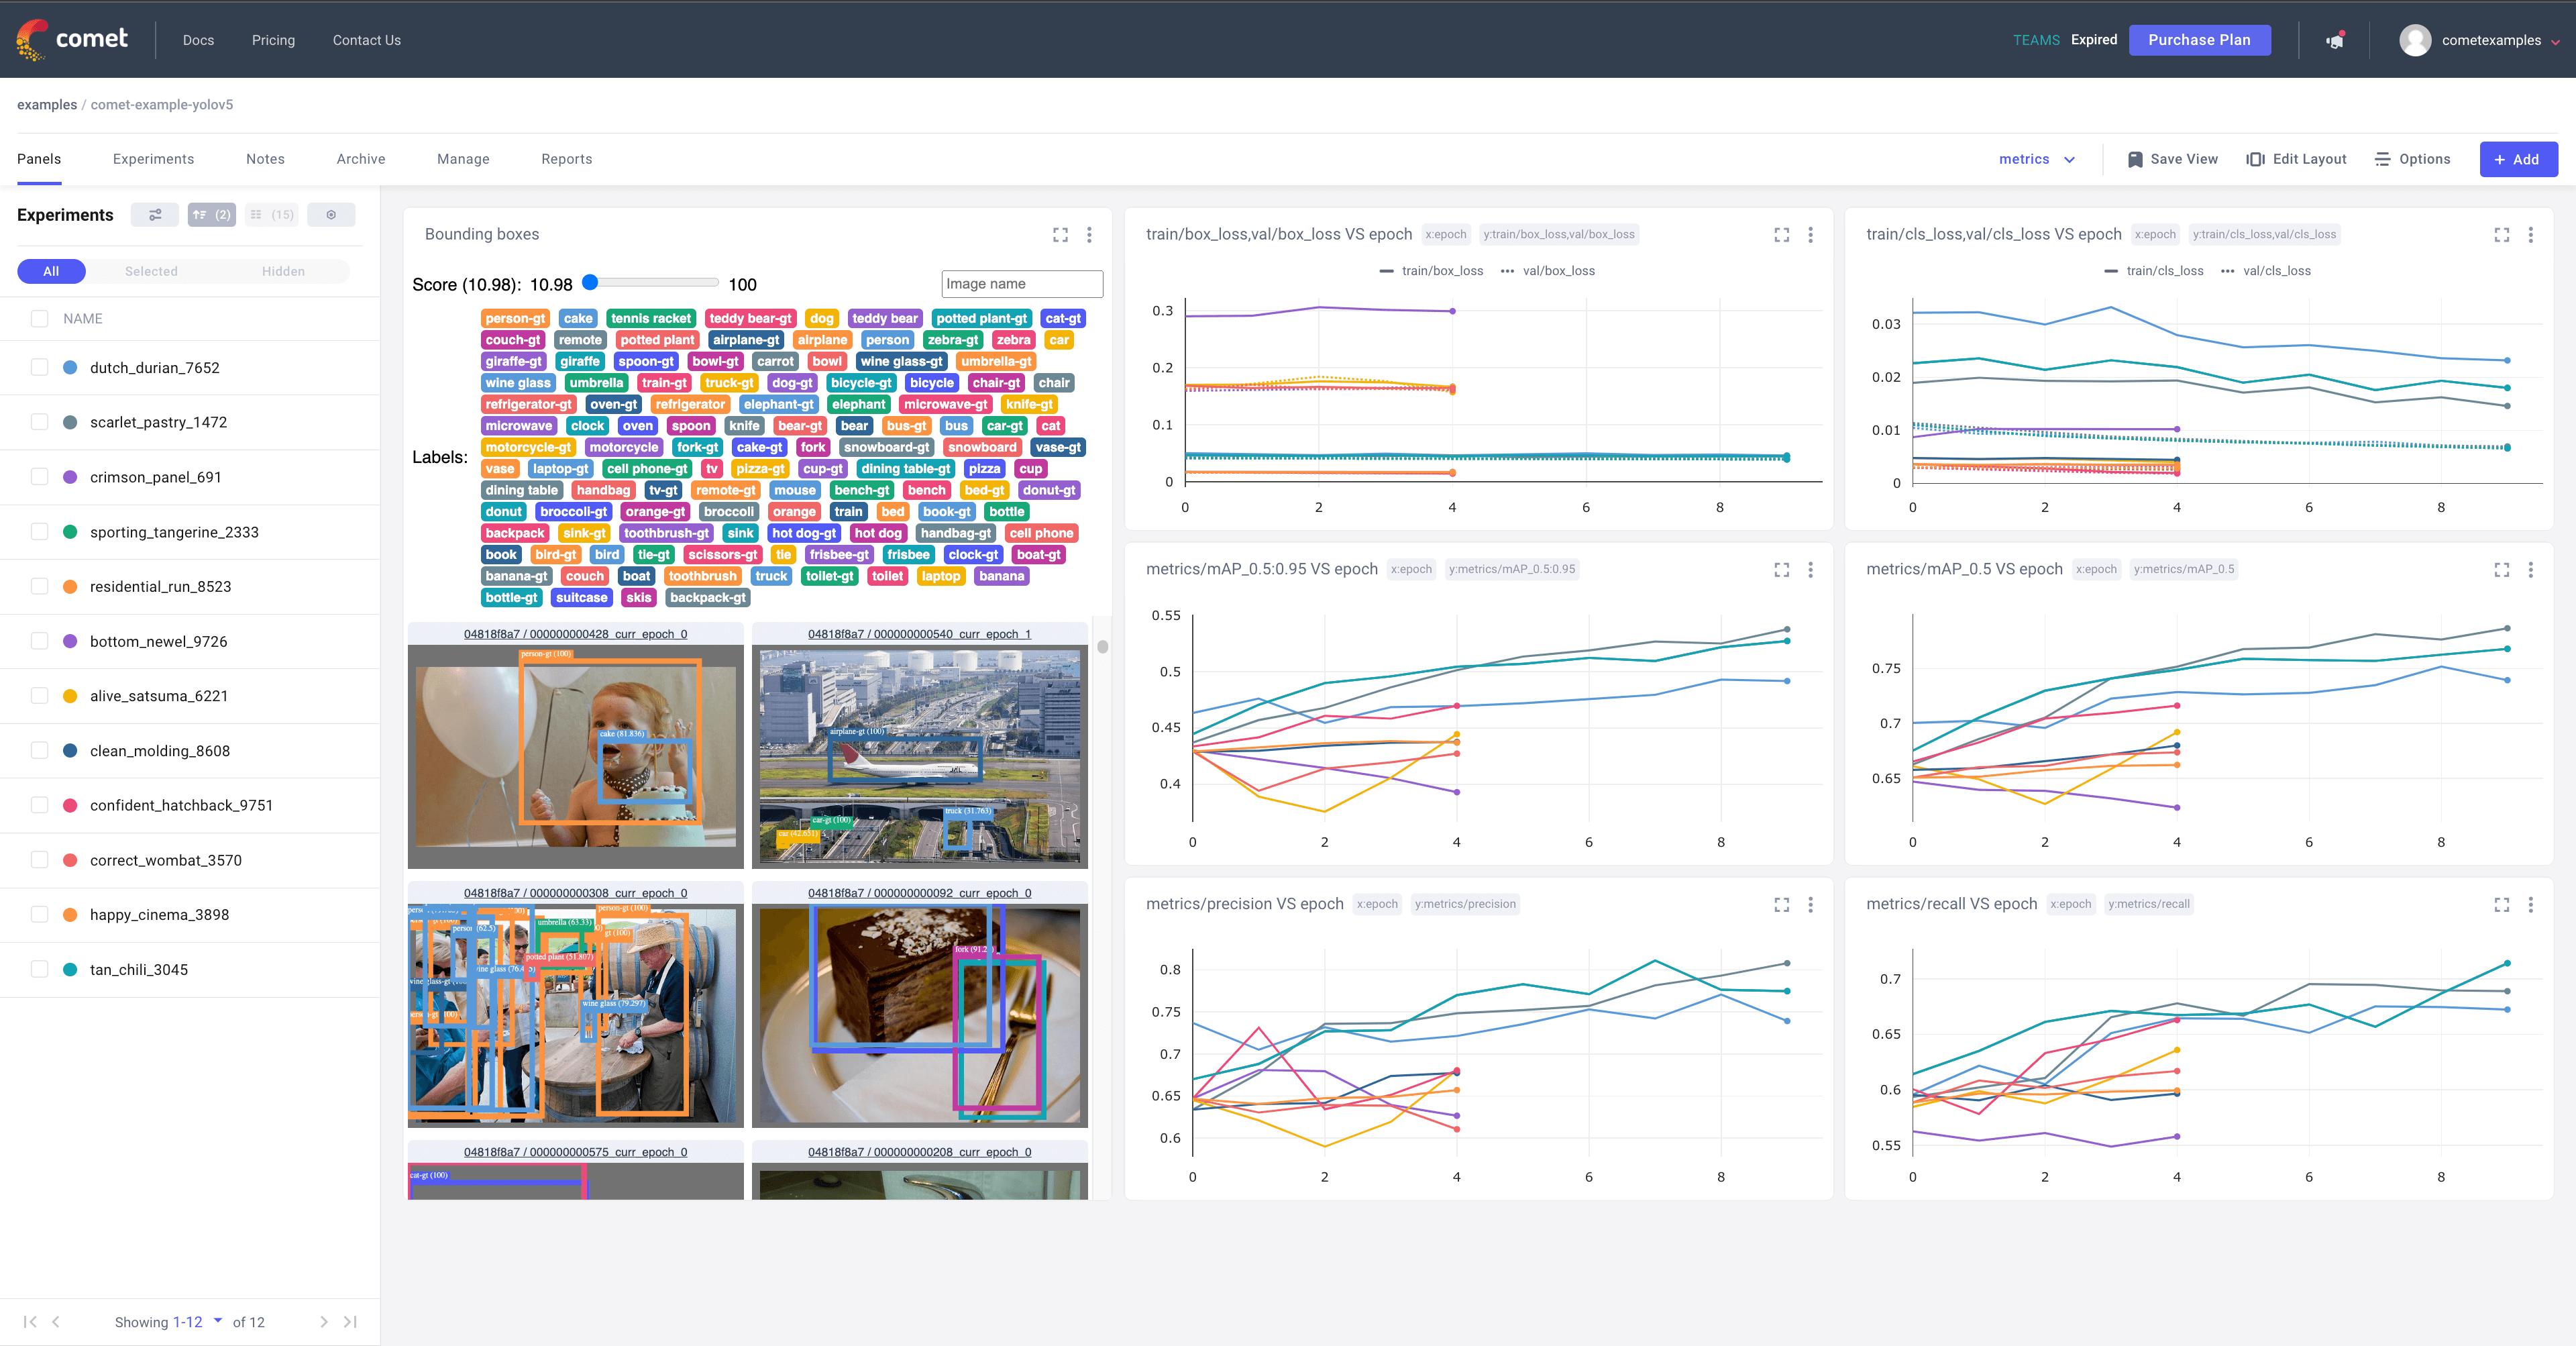
[Comet](https://bit.ly/yolov5-readme-comet) is now fully integrated with YOLOv5. Track and visualize model metrics in real time, save your hyperparameters, datasets, and model checkpoints, and visualize your model predictions with [Comet Custom Panels](https://bit.ly/yolov5-colab-comet-panels)! Comet makes sure you never lose track of your work and makes it easy to share results and collaborate across teams of all sizes!
Getting started is easy:
```shell
pip install comet_ml # 1. install
export COMET_API_KEY= # 2. paste API key
python train.py --img 640 --epochs 3 --data coco128.yaml --weights yolov5s.pt # 3. train
```
To learn more about all the supported Comet features for this integration, check out the [Comet Tutorial](https://docs.ultralytics.com/yolov5/tutorials/comet_logging_integration). If you'd like to learn more about Comet, head over to our [documentation](https://bit.ly/yolov5-colab-comet-docs). Get started by trying out the Comet Colab Notebook:
[](https://colab.research.google.com/drive/1RG0WOQyxlDlo5Km8GogJpIEJlg_5lyYO?usp=sharing)
### 4. Visualize
#### Comet Logging and Visualization 🌟 NEW
[Comet](https://bit.ly/yolov5-readme-comet) is now fully integrated with YOLOv5. Track and visualize model metrics in real time, save your hyperparameters, datasets, and model checkpoints, and visualize your model predictions with [Comet Custom Panels](https://bit.ly/yolov5-colab-comet-panels)! Comet makes sure you never lose track of your work and makes it easy to share results and collaborate across teams of all sizes!
Getting started is easy:
```shell
pip install comet_ml # 1. install
export COMET_API_KEY= # 2. paste API key
python train.py --img 640 --epochs 3 --data coco128.yaml --weights yolov5s.pt # 3. train
```
To learn more about all the supported Comet features for this integration, check out the [Comet Tutorial](https://docs.ultralytics.com/yolov5/tutorials/comet_logging_integration). If you'd like to learn more about Comet, head over to our [documentation](https://bit.ly/yolov5-colab-comet-docs). Get started by trying out the Comet Colab Notebook:
[](https://colab.research.google.com/drive/1RG0WOQyxlDlo5Km8GogJpIEJlg_5lyYO?usp=sharing)
 #### ClearML Logging and Automation 🌟 NEW
[ClearML](https://cutt.ly/yolov5-notebook-clearml) is completely integrated into YOLOv5 to track your experimentation, manage dataset versions and even remotely execute training runs. To enable ClearML:
- `pip install clearml`
- run `clearml-init` to connect to a ClearML server (**deploy your own open-source server [here](https://github.com/allegroai/clearml-server)**, or use our free hosted server [here](https://cutt.ly/yolov5-notebook-clearml))
You'll get all the great expected features from an experiment manager: live updates, model upload, experiment comparison etc. but ClearML also tracks uncommitted changes and installed packages for example. Thanks to that ClearML Tasks (which is what we call experiments) are also reproducible on different machines! With only 1 extra line, we can schedule a YOLOv5 training task on a queue to be executed by any number of ClearML Agents (workers).
You can use ClearML Data to version your dataset and then pass it to YOLOv5 simply using its unique ID. This will help you keep track of your data without adding extra hassle. Explore the [ClearML Tutorial](https://docs.ultralytics.com/yolov5/tutorials/clearml_logging_integration) for details!
 #### Local Logging
Training results are automatically logged with [Tensorboard](https://www.tensorflow.org/tensorboard) and [CSV](https://github.com/ultralytics/yolov5/pull/4148) loggers to `runs/train`, with a new experiment directory created for each new training as `runs/train/exp2`, `runs/train/exp3`, etc.
This directory contains train and val statistics, mosaics, labels, predictions and augmented mosaics, as well as metrics and charts including precision-recall (PR) curves and confusion matrices.
 Results file `results.csv` is updated after each epoch, and then plotted as `results.png` (below) after training completes. You can also plot any `results.csv` file manually:
```python
from utils.plots import plot_results
plot_results('path/to/results.csv') # plot 'results.csv' as 'results.png'
```

## Next Steps
Once your model is trained you can use your best checkpoint `best.pt` to:
* Run [CLI](https://github.com/ultralytics/yolov5#quick-start-examples) or [Python](https://docs.ultralytics.com/yolov5/tutorials/pytorch_hub_model_loading) inference on new images and videos
* [Validate](https://github.com/ultralytics/yolov5/blob/master/val.py) accuracy on train, val and test splits
* [Export](https://docs.ultralytics.com/yolov5/tutorials/model_export) to TensorFlow, Keras, ONNX, TFlite, TF.js, CoreML and TensorRT formats
* [Evolve](https://docs.ultralytics.com/yolov5/tutorials/hyperparameter_evolution) hyperparameters to improve performance
* [Improve](https://docs.roboflow.com/adding-data/upload-api?ref=ultralytics) your model by sampling real-world images and adding them to your dataset
## Supported Environments
Ultralytics provides a range of ready-to-use environments, each pre-installed with essential dependencies such as [CUDA](https://developer.nvidia.com/cuda), [CUDNN](https://developer.nvidia.com/cudnn), [Python](https://www.python.org/), and [PyTorch](https://pytorch.org/), to kickstart your projects.
- **Free GPU Notebooks**: 

 - **Google Cloud**: [GCP Quickstart Guide](../environments/google_cloud_quickstart_tutorial.md)
- **Amazon**: [AWS Quickstart Guide](../environments/aws_quickstart_tutorial.md)
- **Azure**: [AzureML Quickstart Guide](../environments/azureml_quickstart_tutorial.md)
- **Docker**: [Docker Quickstart Guide](../environments/docker_image_quickstart_tutorial.md)
  ## Project Status
 This badge indicates that all [YOLOv5 GitHub Actions](https://github.com/ultralytics/yolov5/actions) Continuous Integration (CI) tests are successfully passing. These CI tests rigorously check the functionality and performance of YOLOv5 across various key aspects: [training](https://github.com/ultralytics/yolov5/blob/master/train.py), [validation](https://github.com/ultralytics/yolov5/blob/master/val.py), [inference](https://github.com/ultralytics/yolov5/blob/master/detect.py), [export](https://github.com/ultralytics/yolov5/blob/master/export.py), and [benchmarks](https://github.com/ultralytics/yolov5/blob/master/benchmarks.py). They ensure consistent and reliable operation on macOS, Windows, and Ubuntu, with tests conducted every 24 hours and upon each new commit.


 ### 4. Visualize
#### Comet Logging and Visualization 🌟 NEW
[Comet](https://bit.ly/yolov5-readme-comet) is now fully integrated with YOLOv5. Track and visualize model metrics in real time, save your hyperparameters, datasets, and model checkpoints, and visualize your model predictions with [Comet Custom Panels](https://bit.ly/yolov5-colab-comet-panels)! Comet makes sure you never lose track of your work and makes it easy to share results and collaborate across teams of all sizes!
Getting started is easy:
```shell
pip install comet_ml # 1. install
export COMET_API_KEY=
 #### ClearML Logging and Automation 🌟 NEW
[ClearML](https://cutt.ly/yolov5-notebook-clearml) is completely integrated into YOLOv5 to track your experimentation, manage dataset versions and even remotely execute training runs. To enable ClearML:
- `pip install clearml`
- run `clearml-init` to connect to a ClearML server (**deploy your own open-source server [here](https://github.com/allegroai/clearml-server)**, or use our free hosted server [here](https://cutt.ly/yolov5-notebook-clearml))
You'll get all the great expected features from an experiment manager: live updates, model upload, experiment comparison etc. but ClearML also tracks uncommitted changes and installed packages for example. Thanks to that ClearML Tasks (which is what we call experiments) are also reproducible on different machines! With only 1 extra line, we can schedule a YOLOv5 training task on a queue to be executed by any number of ClearML Agents (workers).
You can use ClearML Data to version your dataset and then pass it to YOLOv5 simply using its unique ID. This will help you keep track of your data without adding extra hassle. Explore the [ClearML Tutorial](https://docs.ultralytics.com/yolov5/tutorials/clearml_logging_integration) for details!
 #### Local Logging
Training results are automatically logged with [Tensorboard](https://www.tensorflow.org/tensorboard) and [CSV](https://github.com/ultralytics/yolov5/pull/4148) loggers to `runs/train`, with a new experiment directory created for each new training as `runs/train/exp2`, `runs/train/exp3`, etc.
This directory contains train and val statistics, mosaics, labels, predictions and augmented mosaics, as well as metrics and charts including precision-recall (PR) curves and confusion matrices.
 Results file `results.csv` is updated after each epoch, and then plotted as `results.png` (below) after training completes. You can also plot any `results.csv` file manually:
```python
from utils.plots import plot_results
plot_results('path/to/results.csv') # plot 'results.csv' as 'results.png'
```


 ## Project Status